
Last Sunday wasn’t really a pleasant day. On Saturday late night, or rather around Sunday 00.30 am, my MacBook Pro late 2011’s discrete graphic card begin to fail to in the end not being able to boot it properly. The computer was working just fine, it wasn’t even using the discrete card, connected to the external screen as I’ve been doing lately, or any doing any other intensive task. I just rebooted it and 5’ after loading the desktop a solid gray screen appear that allowed to do nothing. After I forced reboot pushing the on/off button, the normal loading gray screen had glitches as thin-horizontal-weird lines. After 3 or 4 boots into the desktop and then the gray screen of dead the computer begin to load directly just to the gray screen of death. Nothing could be done to load the computer normally. I tried safe mode, pressing shift key on boot, and nothing, just the same gray screen of death. Restore mode, alt + R on boot, also the gray screen of death. So, I decided to left the issue to sleep —it was around 1.30 am in the morning, and led the computer to make a hardware test, pressing D key on startup.
It’s not the first time that the discrete graphic card fails in my laptop. It’s a malaise that occurs to almost any 2011 Macbook Pro’s computer. I think there is two kind of machines out there, the ones where the issue already happened and the ones where it’s going to happen. My entire logic board was changed on July 2014 and 3 years and a half down the road it failed again last Sunday. Again, the same faulty chip. This is not proper quality Apple (AMD / Nvidia are also culprits here), and I don’t know whose idea was to mount those logic board / chips on this Mac model, but I think it wasn’t the brightest idea ever.
So, in Sunday morning, after I slept on the issue and I had a proper coffee and breakfast, I got my hands on to try to fix the problem. I begun with searching on internet about the problem and some people suggested that it was a RAM problem. Well, it could have been. The last time I did a hardware test, when I changed my hard drive in the US, it yielded a RAM problem, and this time threw me the same error.

So I decided to give it a try to this guy’s suggestion and I even switched the RAM for the original ones, since I upgraded 4 years ago to two 8 GB modules. However, the result was always the very exact one. So I decided to ditch the idea that the RAM was the cause of the grey screen of death, reinstalled the RAM and looked for another solution.
Finally, I found these solutions (1, 2, 3 and 4), which were quite recent. It seems that a lot of boards are dying all over again. The solution is quite simple, since what is failing is the discrete graphic card and you usually don’t use it in your daily life, you just have to stop using that card at all, and use all the time the integrated one. Problem solved. But, how do you make that happen when the only thing you are able to see is the grey screen of death? Basically you make the computer to not boot using the drivers for the discrete graphic car. The solution works, but there is some caveats, under High Sierra. One is that your Mac is not longer going to sleep properly, but it can be fixed just changing the sleep mode to hibernation. And that the bright control is not longer going to work, at least at the moment. I can live with that.
I’m going to summarize here what I’ve done to fix it under High Sierra macOS 10.13.1 on my Late 2011 MacBook Pro.
The solutionPermalink
First of all, I have to say that I begun with the solution number 1 and then I switch to the 2, 3 and 4 ones. Probably, you are fine to proceded from the solution number 2 onwards. To make make those solutions work in the long run, you are going to need a USB stick in order to have a way of booting your Mac, from the very beginning, or when you update your system and the fix stop working as a consequence of the update. You don’t need a very big USB stick. What you are going to store on it it’s not going to more than 10 mb.
Moving the kextsPermalink
This step isn’t really necessary, and you can jump to the next step. However, this is the exactly how I did things, since first I found one solution and then the others. Also, if you have trouble booting with the other solutions, perhaps this part is going to help you.
You need to boot on single user mode (press and hold `Cmd + S + R ) and run the following commands.
1
2
3
4
5
6
7
8
9
fsck -fy # to check a disk
mount -uw / # mount a root filesystem with read/write permissions
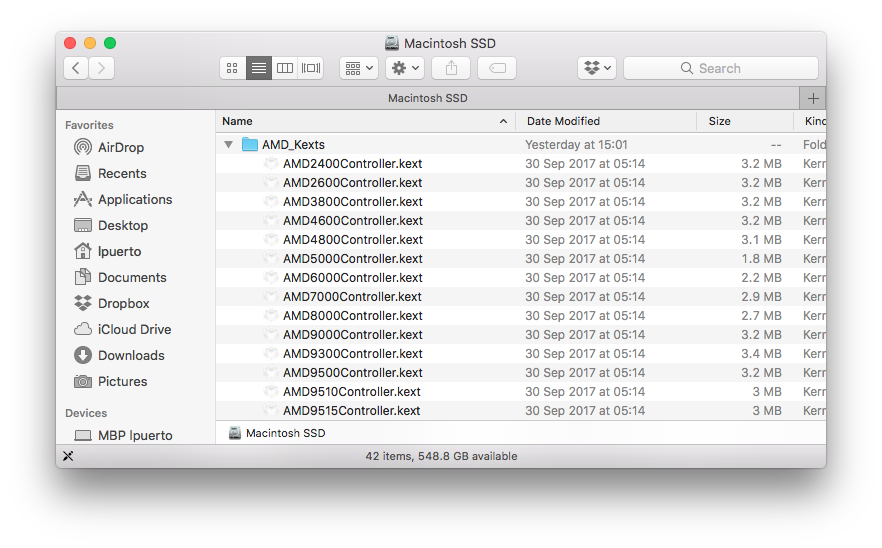
sudo mkdir /AMD_Kexts/ # make a directory to store the AMD drivers in case you'll need them in future
sudo mv /System/Library/Extensions/AMD*.* /AMD_Kexts/ # move the AMD drivers
sudo rm -rf /System/Library/Caches/com.apple.kext.caches/ # remove the AMD drivers cache
sudo mkdir /System/Library/Caches/com.apple.kext.caches/ # just in case OS X will be dumb and will not recreate this directory, I am creating it for OS X
sudo touch /System/Library/Extensions/ # to update the timestamps so that new driver caches - without AMD drivers - will be definitely rebuilt
sudo umount / # umount a partition to guarantee that your changes are flushed to it
sudo reboot
However, in the same way as the solution’s poster, when I tried to delete the kext the Mac was throwing me the error operation not allowed or something similar. Probably because in the same way as s/he, I have my disk locked as “read-only” after too many attempt of booting. Lucky, I didn’t need to mount my disk on Linux, as s/he did. I just took my disk out of my Mac and put it in a USB enclosure that I connected to another Mac with High Sierra. I have High Sierra installed in my machine with the new APFS, so that means that my disk in only readable by other Macs with High Sierra installed. Dangerous, yes, but I wanted to take advantage of the new features. Backups were invented for some reason.
From there, I just needed to performed the same commands but a little bit different. You have to take into account that in macOS your hard drive is going to mount automatically, so it wasn’t necessary to mount it like before, and you just have to run the rest of the commands with the proper path and the name of your drive. In my case my hard drive name is Macintosh SSD, and in this Mac there is also a Macintosh SSD, so when it mounted my hard drive macOS renamed it to to Macintosh SSD 1, In the shell you have to proper indecate the blank spaces on name and paths using the backslash symbol \, therefore I could access to my hard drive using the name Macintosh\ SSD\ 1. Mind the name of your hard drive (usually Macintosh HD) and change the path in the commands in consequence.
1
2
3
4
5
6

sudo mkdir /Volumes/Macintosh\ SSD\ 1/AMD_Kexts/ # make a directory to store the AMD drivers in case you'll need them in future
sudo mv /Volumes/Macintosh\ SSD\ 1/System/Library/Extensions/AMD*.* /AMD_Kexts/ # move the AMD drivers
sudo rm -rf /Volumes/Macintosh\ SSD\ 1/System/Library/Caches/com.apple.kext.caches/ # remove the AMD drivers cache
sudo mkdir /Volumes/Macintosh\ SSD\ 1/System/Library/Caches/com.apple.kext.caches/ # just in case OS X will be dumb and will not recreate this directory, I am creating it for OS X
sudo touch /Volumes/Macintosh\ SSD\ 1/System/Library/Extensions/ # to update the timestamps so that new driver caches - without AMD drivers - will be definitely rebuilt
sudo umount /Volumes/Macintosh\ SSD\ 1/ # umount a partition to guarantee that your changes are flushed to it<br>
Now, you can take your disk, reinstall it in your Mac and begin from there. I booted to something like this
Using solutions 2, 3 and 4Permalink
That’s beginning… at least now I knew that my computer can be booted. Then, I decided to switch solutions and continue with the fix explained in 2, which is fully explained in 3. The reason… because seemed more recent and better explained, and more stable in the long term. So, as it’s detailed in that solutions, first reset the SMC and the NVRAM. Then, boot your Mac on recovery single user mode (pressing and holding Cmd + S + R) and run the following commands.
1
2
3

nvram fa4ce28d-b62f-4c99-9cc3-6815686e30f9:gpu-power-prefs=%01%00%00%00
csrutil disable
reboot
Now, and since you moved the GPU kext from their original location you are going to boot to something like this.
Hey!! you probably are thinking… I’ve done it, I’ve fixed. it. Yes & not. Since you’ve moved the kexts from their original place things are working more or less correctly, however, if you updated the system, you are going to probably have to move your kext and apply the solution again. For that reason, they decided to created a nicer solution implementing GRUB on your start up disk and blocking the loading of those kexts on booting. GRUB is the same system you put in place when you are installing Linux in a computer and you want to have more than one OS in the machine. This solution allow us to keep the kexts in place and boot without loading them. The solution isn’t perfect, but at least is easy to implement and in case you install a system update you can easily reimplement.
At this point, I recommend to move the kexts to the original location /System/Library/Extensions/.
You can do it dragging and dropping those back to its original location (it’s going to ask for your password), or you just can move then with terminal:
1

sudo mv /AMD_Kexts/*.* /System/Library/Extensions/
Getting a GRUBPermalink
Now, to implement the complete solution you have to download ubuntu to take the GRUB from there. I’ve downloaded Ubuntu 17.10
1

hdiutil attach -nomount ~/Downloads/ubuntu-17.10-desktop-amd64.iso
Which probably turns something like this:
1
2
3

/dev/disk2              Apple_partition_scheme
/dev/disk2s1            Apple_partition_map
/dev/disk2s2            Apple_HFS
The disk number could be different, for example in my case the first time was disk3, but mounted a second time and was disk2. Depends on how many disks have you mounted before.
Now you can finally mount the ISO with the following commands:
1
2
3
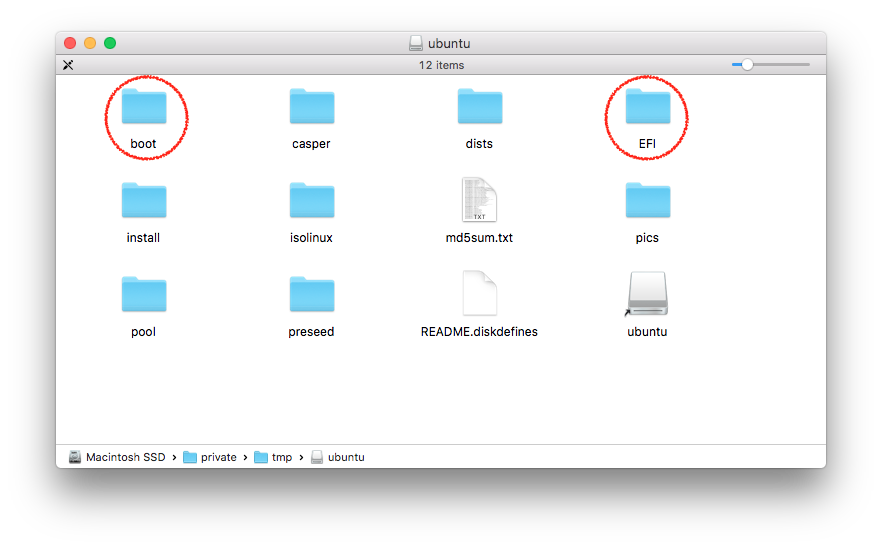
mkdir /tmp/ubuntu
mount -t cd9660 /dev/disk2 /tmp/ubuntu/
open /tmp/ubuntu/shell
Preparing the USB stick and editing GRUB filePermalink
You have to format you USB stick to FAT32 and it’s recomendable to name it boot folders from the ISO to your USB stick root.
When you have those folders on your USB stick, you have to edit the file /RESCUE/boot/grub/grub.cfg. I like Atom to edit, but perhaps you don’t have it installed so if you type:
1

open /Volumes/RESCUE/boot/grub/grub.cfg
Your default text editor will open. In case you want to be sure and open with Text Edit:
1

open -a TextEdit /Volumes/RESCUE/boot/grub/grub.cfg
Then you have to delete all the file content and paste the following.
1
2
3
4
5
6
7
8
9
10
11
12
13
14
15
16
17
18
19
20

if loadfont /boot/grub/font.pf2 ; then
    set gfxmode=auto
    insmod efi_gop
    insmod efi_uga
    insmod gfxterm
    terminal_output gfxterm
fi

set menu_color_normal=white/black
set menu_color_highlight=black/light-gray

set timeout=0
menuentry "macOS" {
    outb 0x728 1
    outb 0x710 2
    outb 0x740 2
    outb 0x750 0
    outb 0x714 0xFF
    exit
}
Take into account that is a specific GRUB configuration for High Sierra and with a single OS installed. If you have more that one OS or you are under other OS check this. Note that I’ve added a line to the original proposed GRUP file at almost at the end. This is because someone suggest that line on this thread. I’ve also set the timeout variable to zero, since I don’t want to push enter to continue or wait 10 seconds. I don’t have anything to chose from.
Save the file and let’s copy now to you Mac. Or perhaps, you can test if this works properly rebooting using the USB stick. For that you have to reboot and then push alt after you hear the chime, introduce the USB stick and choose it on the menu. You should be able to reboot normally.
Making it permanentPermalink
Now you can make this permanent and without need the USB. You run on terminal the following commands with your USB still plugged and assuming that you named it RESCUE.
1
2
3
4
5
6
7
8
9

cd /Volumes
sudo mkdir efi
sudo mount -t msdos /dev/disk0s1 /Volumes/efi
sudo mkdir /Volumes/efi/boot
sudo mkdir /Volumes/efi/EFI/grub
sudo cp -R /Volumes/RESCUE/boot/ /Volumes/efi/boot
sudo cp -R /Volumes/RESCUE/EFI/boot/ /Volumes/efi/EFI/grub
sudo bless --folder=/Volumes/efi --file=/Volumes/efi/EFI/grub/grubx64.efi --setBoot
sudo bless --mount=/Volumes/efi --file=/Volumes/efi/EFI/grub/grubx64.efi --setBoot
Now… you can unmount the USB and boot without it.
Preventing GPU from waking up from sleepPermalink
When you are under High Sierra, the next step doesn’t really work, and even installing this kext is going to return to a black screen when you return form sleep. To prevent this, you can just change the way your Mac sleep and make it hibernate. If you have a SSD in place, like I have, the difference on time between waking up from a normal sleep than from hibernation is going to be neglectable. The only real difference is, your computer isn’t going to wake up when you lift the lid and you have to push the on/off button to wake your Mac up. To set this up you have to run on terminal:
1

sudo pmset -a hibernatemode 25
If you want to return to the normal sleep mode you set in the following way:
1

sudo pmset -a hibernatemode 3
Anyhow, I decided to apply the solution as it’s explained here and I even created a kext myself for High Sierra. Just in hopes that in a close future things improve I can normally sleep. If you download the kext you just have to unzip it and then copy to /Library/Extensions and run the following commands.
1
2
3

sudo chmod -R 755 /Library/Extensions/AMDGPUWakeHandler.kext
sudo chown -R root:wheel /Library/Extensions/AMDGPUWakeHandler.kext
sudo touch /Library/Extensions
And reboot.
Now, you are done.
Reimplementing the fixPermalink
If you need to reimplement the solution because you updated the system you are going to need to just bless GRUB disk again —make it a bootable disk. You just boot from the rescue USB stick and run the following commands on terminal
1
2
3
4
5

cd /Volumes
sudo mkdir efi
sudo mount -t msdos /dev/disk0s1 /Volumes/efi
sudo bless --folder=/Volumes/efi --file=/Volumes/efi/EFI/grub/grubx64.efi --setBoot
sudo bless --mount=/Volumes/efi --file=/Volumes/efi/EFI/grub/grubx64.efi --setBoot
Final notePermalink
As I’ve mentioned earlier, there are only two caveats to this solution if you are under High Sierra. One is that you lose the ability to sleep you computer normally and you have to hibernate. Nothing really serious if you have an SSD. The other is more serious… or at least is going to affect you more in your daily basics. You are not going to be able to control the brightness of your computer anymore. It’s something that MacRumors community is trying to fix.
Anyhow, the weir way that High Sierra manages the bright isn’t something new. And during the betas, some people commented about this on the developers forum as well, here and here.
Why this happens?Permalink
You’re probably wondering yourself why this is happening to your computer although if you have researched a little bit about the problem you probably already know what is the problem. Really bad quality graphic chips that due to heat in the computer finally fails. You can learn a little bit in this video.
To sum it up… AMD / Nvidia chips mounted in logic board of this model are really bad and I guess most of them are faulty. The lack of proper ventilation on Macs, specially in this models, doesn’t improve things and make then even more prone to this kind of issues. There is a technique called reballing, which basically consist repair the littles balls that the chip uses to connect to the logic board. However, this is just a temporal solution since the problem is in the chip itself. Reballing works just because when you heat up the chip to reball it you mess with some of the internal parts of the chip —I think they call this reflow— and that makes it to work properly again, but after a while the problem is going to return. I’ve read that some people just put the board in the oven at around 200ºc to fix the issue, but I guess doesn’t last a lot either.
The only long working solution is just get another board, or just another chip, and pray that this time it isn’t faulty. Change the board isn’t complicated, at least not incredible. But invest 400€, or even more, in a 6 years old computer is something you really have to ponder.
Anyway, the only ones here to blame is AMD / Nvidia and or course Apple, they knew the issue all this time and they’ve done nothing to fix it. And for that reason Apple is being sued.
It’s time to think if it’s really worth to spend the money Apple tags their computers. I’m really willing pay, but I expect a top-notch silent computer and service. Besides, it seems that Apple has forgotten that professional customers really need professional computers and the last batch seems that isn’t up to the mark and Apple has received a lot of backlash for it. So big has been the adverser reaction that Apple has to even make an statement addressing it.
Related issues?Permalink
While I was in the US we got a beautiful 24” cinema display that I connected to my machine and we enjoyed a lot. At that moment, I was concerned by the extensive use I was doing of the dGPU when connected to the external screen and I asked in the Apple communities about the issue. They replied that it was the intended way to use the computer and I shouldn’t worry. I don’t blame then, because what they told me, was true, it was/is the normal way to use the computer and how it was designed. Perhaps bad designed, or at least not really thoroughly thought. When you connect the computer to a external screen you trigger the use of the dGPU, not because you really need it —you can perfectly work with the integrated as other models do, but because the thunderbolt connection where you connect the external screen leads directly to the graphic card there is no way to avoid it’s use. This cause an increase of temperature of more or less 20º from the normal operation, just for connecting a external display, and in my humble opinion there is nothing of extensive use in connecting it to a external display.
In the same way… An almost month ago I installed High Sierra and I noticed a weird error related to graphics on the console:
![[ERROR] — Unknown CGXDisplayDevice: 0x41dcd00](/assets/images/blog/2018/Screen-Shot-2017-12-04-at-00.23.58.png)
The error is still there right now, and I told Apple about it when I noticed. They contacted me and collected some data. They never return to me about this issue. Now, I wondering if this two issues are connected and High Sierra accelerated the degradation process of the Nvidia / AMD chip.
-
To be entirely honest I don’t remember if after deleting the kexts I was able to boot directly to the striped desktop or I needed to run the commands in the beginning of solution 2. ↩
-
Previusly I downloaded a spefific release of Ubuntu. I’ve changed to the last one. ↩
-
Today, 8th of December 2017, I decided to install the update to 10.13.2. It worked really well, and even booted without needed to apply the fix again. In other words, the discrete GPU was working. However, after a while fail, and took me more than what I wanted to reestablish everything. So my recommendation is, if you update, apply the fix as soon as possible, but cause sooner or later things are going to go south and it’s going to take you even more time to fix it. In my case I needed to apply the solution almost from the very beginning and a NVRAM reset was necessary to be able to operate again the computer. Good luck! ↩


Leave a comment