
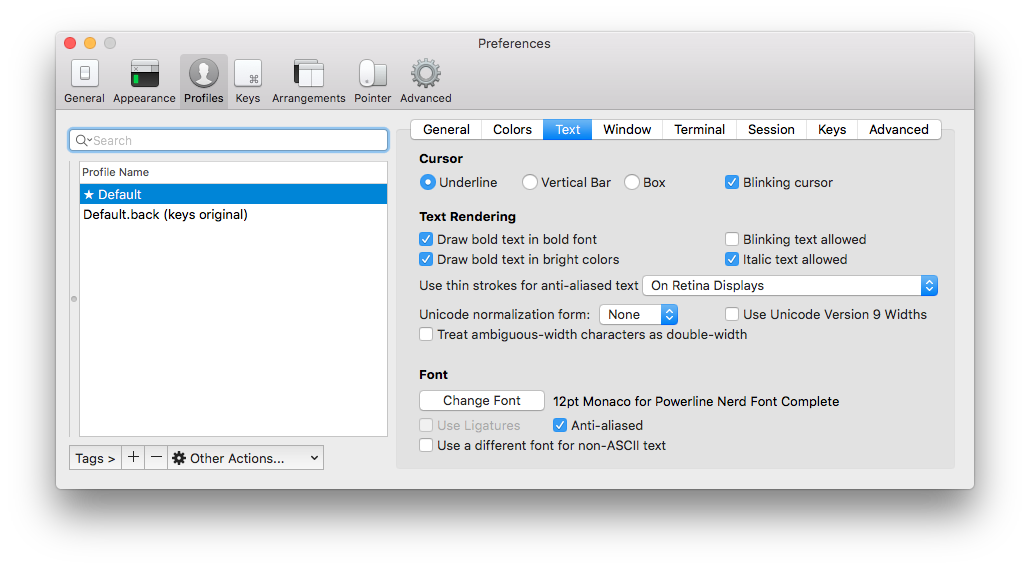
In general, I don’t use my Mac’s Terminal app. Instead, I use iTem2 with a special configuration, that doesn’t use Bash, but Oh My Zsh as a shell, that is a framework to manage Zsh configuration as your shell. This framework allows you to install plugins or configure your prompt, among other cool things. I’ve also configured iTerm2 to work with a patched Monaco
How you can get something similar? Reach this configuration is quite easy. These are the directions:
Install iTerm2Permalink
I would begin installing iTerm2. iTerm2 is just an app similar to Terminal, but with steroids. It has far more options and even have mouse support.
To install iTerm we are going to use Homebrew:
1

brew cask install iterm2
Now that you have iTerm2 you have to install Oh My Zsh.
Install Oh My ZshPermalink
To install Oh My Zsh you need to have installed in your system Git. Usually that is not a problem because Mac comes with its own Git, but remember that you can update to the last version easily using Homebrew.
However, you can’t install Oh My Zsh itself using Homebrew, but you can use cURL or Wget, which probably you have already installed in your system. If you don’t have any of those, you can install them through Homebrew. To install Oh My Zsh you can run the following commands:
1

sh -c "$(curl -fsSL https://raw.githubusercontent.com/robbyrussell/oh-my-zsh/master/tools/install.sh)"
or
1

sh -c "$(wget https://raw.githubusercontent.com/robbyrussell/oh-my-zsh/master/tools/install.sh -O -)"
Oh My Zsh has a autoupdate feature, so don’t worry about update. From time to time, it’s going to ask you to check the repo where it’s stored for updates.
Installing Powerlevel9K themePermalink
Powerlevel9K is a Oh My Zsh external theme that gives it that awesome look and the capacity to configure the prompt, yet keep it light. There are literally dozens of themes, whether included in the Oh My Zsh repo or external ones, and Powerlevel9K is one of the external ones, so you have to download (clone the repo) and store it on the custom part for the Oh My Zsh configuration folders. To do so, just run the following command in your terminal.
1

git clone https://github.com/bhilburn/powerlevel9k.git ~/.oh-my-zsh/custom/themes/powerlevel9k
Configuring Oh My Zsh & PowerLevel9KPermalink
When you have Oh My Zsh installed you can begin to configure. In order to do that you have to open the configuration file, which is located in your user folder, with your favorite text editor. In my case I like to use Atom, so I run the following command in the terminal.
1

atom ~/.zshrc
Bellow you can see my configuration file. The important lines are highlighted.
1
2
3
4
5
6
7
8
9
10
11
12
13
14
15
16
17
18
19
20
21
22
23
24
25
26
27
28
29
30
31
32
33
34
35
36
37
38
39
40
41
42
43
44
45
46
47
48
49
50
51
52
53
54
55
56
57
58
59
60
61
62
63
64
65
66
67
68
69
70
71
72
73
74
75
76
77
78
79
80
81
82
83
84
85
86
87
88
89
90
91
92
93
94
95
96
97
98
99
100
101
102
103
104
105
106
107
108
109
110
111
112
113
114
115
116
117
118
119
120
121
122
123
124
125
126
127
128
129
130
131
132
133
134
135
136
137
138
139
140
141
142
143
144
145
146
147
148
149
150
151
152
153
154

# Setting language and localization variables
export LC_ALL=en_US.UTF-8
export LANG=en_US.UTF-8

# Setting $JAVA_HOME
export JAVA_HOME="$(/usr/libexec/java_home)"

# Setting $PATH
## If you come from bash you might have to change your $PATH.
export PATH=$HOME/bin:$PATH
export PATH=/usr/local/sbin:$PATH
# export PATH=/usr/local/bin:$PATH
## Path for LLVM install
export PATH=/usr/local/opt/llvm/bin:$PATH
## Path for Golang
export GOPATH=$HOME/golang
export GOROOT=/usr/local/opt/go/libexec
export PATH=$PATH:$GOPATH/bin
export PATH=$PATH:$GOROOT/bin

# Setting R variables
export R_LIBS_USER=$HOME/Library/R/3.x/library

# Path to your oh-my-zsh installation.
export ZSH=~/.oh-my-zsh

# Set name of the theme to load. Optionally, if you set this to "random"
# it'll load a random theme each time that oh-my-zsh is loaded.
# See https://github.com/robbyrussell/oh-my-zsh/wiki/Themes
# ZSH_THEME="agnoster"

ZSH_THEME="powerlevel9k/powerlevel9k"
# POWERLEVEL9K_MODE='nerdfont-complete'
POWERLEVEL9K_MODE='awesome-fontconfig' # This is another way
# POWERLEVEL9K_MODE='awesome-patched' # This isn't working

# Disable dir/git icons
POWERLEVEL9K_HOME_ICON=''
POWERLEVEL9K_HOME_SUB_ICON=''
POWERLEVEL9K_FOLDER_ICON=''

# DISABLE_AUTO_TITLE="true"

POWERLEVEL9K_VCS_GIT_ICON=''
POWERLEVEL9K_VCS_STAGED_ICON='\u00b1'
POWERLEVEL9K_VCS_UNTRACKED_ICON='\u25CF'
POWERLEVEL9K_VCS_UNSTAGED_ICON='\u00b1'
POWERLEVEL9K_VCS_INCOMING_CHANGES_ICON='\u2193'
POWERLEVEL9K_VCS_OUTGOING_CHANGES_ICON='\u2191'

POWERLEVEL9K_VCS_MODIFIED_BACKGROUND='yellow'
POWERLEVEL9K_VCS_UNTRACKED_BACKGROUND='yellow'
# POWERLEVEL9K_VCS_UNTRACKED_ICON='?'
# POWERLEVEL9K_SHOW_CHANGESET='true'

# Root indicator config
POWERLEVEL9K_ROOT_INDICATOR_BACKGROUND="red"
POWERLEVEL9K_ROOT_INDICATOR_FOREGROUND="white"
POWERLEVEL9K_ROOT_ICON='\u26A1'

# Prompt elements
POWERLEVEL9K_LEFT_PROMPT_ELEMENTS=(status os_icon root_indicator context dir vcs)
POWERLEVEL9K_RIGHT_PROMPT_ELEMENTS=(background_jobs virtualenv rbenv rvm time)

POWERLEVEL9K_SHORTEN_STRATEGY="truncate_middle"
POWERLEVEL9K_SHORTEN_DIR_LENGTH=4

POWERLEVEL9K_TIME_FORMAT="%D{%H:%M:%S \uf073 %d.%m.%y}"

POWERLEVEL9K_STATUS_VERBOSE=false

export DEFAULT_USER="$USER"


# Uncomment the following line to use case-sensitive completion.
# CASE_SENSITIVE="true"

# Uncomment the following line to use hyphen-insensitive completion. Case
# sensitive completion must be off. _ and - will be interchangeable.
# HYPHEN_INSENSITIVE="true"

# Uncomment the following line to disable bi-weekly auto-update checks.
# DISABLE_AUTO_UPDATE="true"

# Uncooment the following line to autoupdate without prompt
DISABLE_UPDATE_PROMPT="true"

# Uncomment the following line to change how often to auto-update (in days).
# export UPDATE_ZSH_DAYS=13

# Uncomment the following line to disable colors in ls.
# DISABLE_LS_COLORS="true"

# Uncomment the following line to disable auto-setting terminal title.
# DISABLE_AUTO_TITLE="true"

# Uncomment the following line to enable command auto-correction.
# ENABLE_CORRECTION="true"

# Uncomment the following line to display red dots whilst waiting for completion.
# COMPLETION_WAITING_DOTS="true"

# Uncomment the following line if you want to disable marking untracked files
# under VCS as dirty. This makes repository status check for large repositories
# much, much faster.
# DISABLE_UNTRACKED_FILES_DIRTY="true"

# Uncomment the following line if you want to change the command execution time
# stamp shown in the history command output.
# The optional three formats: "mm/dd/yyyy"|"dd.mm.yyyy"|"yyyy-mm-dd"
# HIST_STAMPS="mm/dd/yyyy"

# Would you like to use another custom folder than $ZSH/custom?
# ZSH_CUSTOM=/path/to/new-custom-folder

# Which plugins would you like to load? (plugins can be found in ~/.oh-my-zsh/plugins/*)
# Custom plugins may be added to ~/.oh-my-zsh/custom/plugins/
# Example format: plugins=(rails git textmate ruby lighthouse)
# Add wisely, as too many plugins slow down shell startup.
plugins=(git colored-man colorize github jira vagrant virtualenv pip
          python brew osx zsh-syntax-highlighting)
source $ZSH/oh-my-zsh.sh
source /usr/local/share/zsh-syntax-highlighting/zsh-syntax-highlighting.zsh
source /usr/local/share/zsh-autosuggestions/zsh-autosuggestions.zsh
# source ~/.fonts/*.sh

# User configuration

# export MANPATH="/usr/local/man:$MANPATH"

# You may need to manually set your language environment
# export LANG=en_US.UTF-8

# Preferred editor for local and remote sessions
# if [[ -n $SSH_CONNECTION ]]; then
#   export EDITOR='vim'
# else
#   export EDITOR='mvim'
# fi

# Compilation flags
# export ARCHFLAGS="-arch x86_64"

# ssh
# export SSH_KEY_PATH="~/.ssh/rsa_id"

# Set personal aliases, overriding those provided by oh-my-zsh libs,
# plugins, and themes. Aliases can be placed here, though oh-my-zsh
# users are encouraged to define aliases within the ZSH_CUSTOM folder.
# For a full list of active aliases, run `alias`.
#
# Example aliases
alias zshconfig="atom ~/.zshrc"
# alias ohmyzsh="mate ~/.oh-my-zsh"
As you can see I have a lot the lines commented with #, since I don’t want to use that config, but I didn’t lose them. From line 28 to 73, it’s basically the configuration of the prompt. There are literally dozens of ways to configure the prompt, and you can see some of them here. Mine is quite similar to Falkor’s one, but I’ve edited it a little bit. You can find out more about how to stylizing your prompt and how the configuration variables work here and here.
Don’t forget to set your theme as Powerlevel9k —line 33 ZSH_THEME="powerlevel9k/powerlevel9k"— and also the Powerlevel mode —line 35. The Powerlevel Mode define the type —or the style— of glyphs than are shown.
You can see also that in the lines 118 — 122 are the plugins I’m using and that in the the line 151 I establish a shortcut to access to the configuration through atom just typing zshconfig.
Configuring iTerm2Permalink
Finally, you have to configure iTerm2 to use your patched font if you want the glyphs to shown in your prompt
If you don’t want to patch any font, you can download any of the prepatched fonts, and I recommend do it using Hombrew.
1
2

brew tap caskroom/fonts
brew cask install font-meslo-nerd-font #if you want to install Meslo font

Finally you can configure the colors in iTerm2. Usually people use of of the presets iTerm have, or the ones you can download. But I have tweaked a little bit the colors and I have my own configuration.
Now you are ready to use iTerm2 with your new configuration.
Setting Zsh as your default shellPermalink
First you need to check what version, if any, of Zsh you have installed.
1

zsh --version
in my case and right now my version is 5.4.2, but you can check which is the last version in the wikipedia page.
Now you have to check that you have Zsh in your list of authorized shells. You have check running opening the file /etc/shells with atom:
1

atom /etc/shells
You have to see something similar to this.
1
2
3
4
5
6
7
8
9
10
11

# List of acceptable shells for chpass(1).
# Ftpd will not allow users to connect who are not using
# one of these shells.

/bin/bash
/bin/csh
/bin/ksh
/bin/sh
/bin/tcsh
/bin/zsh
/usr/local/bin/bash
If you don’t have the line 10, add it and save the file.
Now you run the following command to make Zsh your default shell:
1
2

chsh -s
$(which zsh)
Keeping Terminal with the previous configPermalink
Since I have iTerm2 with Oh My Zsh, I like to keep Terminal with Bash. Since we’ve set as a default terminal Zsh we need to set up manually to use Bash.
Open Terminal and launch the options screen Cmd + ;. In the General tap you can find which shell use terminal. Choose command and type /bin/bash.
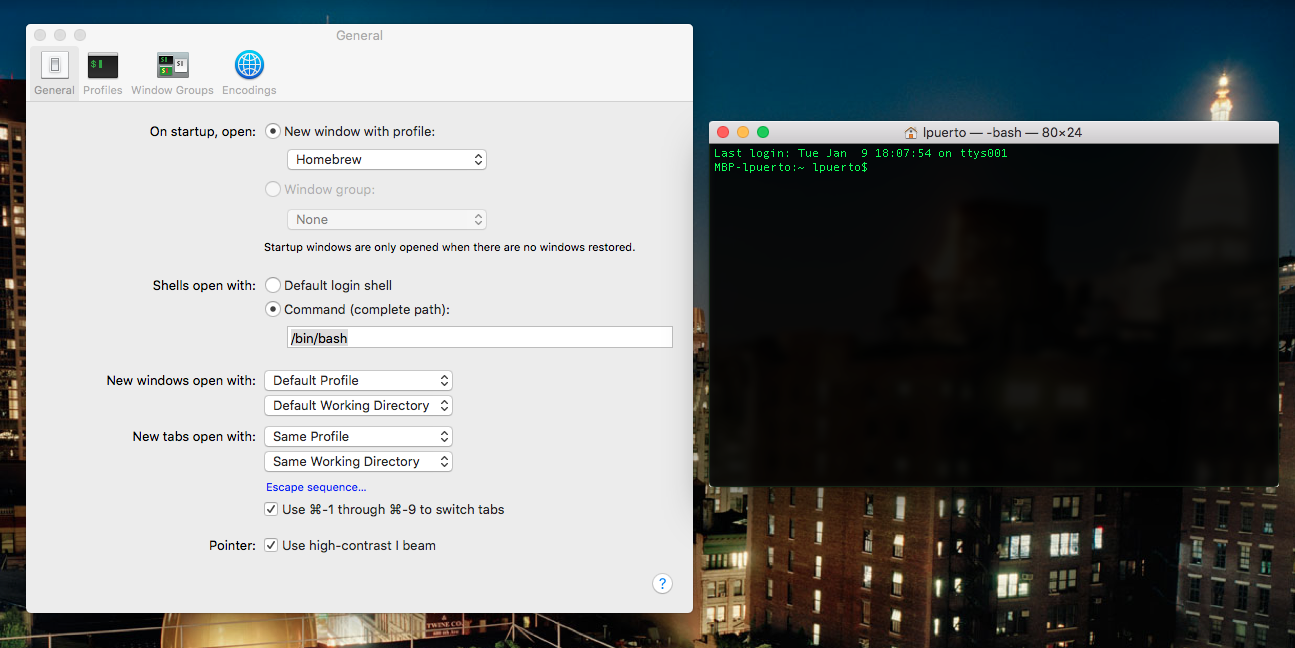
Done, now you can enjoy the best of the two worlds. Enjoying a new, more flexible and customizable shell as default, while keeping your old one, just in case you felt nostalgic.
-
I was about to upload my patched Monaco font, but then I realize that I can’t post any modification of the Monaco font since it’s copyrighted by Apple. However, you can easily patch your copy of the font for your personal use with the script provided by Nerd Fonts. I faced some problems when I tried to patch it myself, basically related to the height of the patched font, which ended up different than the original font. If this is your case, you can just download FontForge —
brew cask install fontforge— and modify those parameters to be equal to the original ones ↩


Leave a comment